In part 1 of this article series about deploying multi-tenant Kubernetes deployments in a VPC-native cluster with Spinnaker on Google Kubernetes Engine (GKE), we set up a basic CI/CD solution using Spinnaker and a Single GKE cluster. The solution as-is from part 1 is not suited for production because any change made by a developer would be automatically publish into production without proper validation. In this second article, we are going to build on top of the infrastructure we set up in part 1 and learn how we can add new environments to develop and validate our application without impacting the production environment.

A production-grade environment requires quality and stability for the delivered applications. This requires development and validation processes within the application life cycle, from daily updates from the development team to the proper testing of the application by the quality assurance team before releasing the application.
By the end of this article, we will have a Development, Staging, and Production environment which will be used by Spinnaker to deploy the application in.
Adding Environments
Making sure we deliver a stable and high quality application requires proper testing and validation before being made available to the users. Failing to do so is likely to result in long delays between releases, incomplete (or lack of) new functionalities, or even unexpected breaking changes in the application – making it partially unusable by the users.
This can lead to financial loss for the customer relying on the solution, make the customers unhappy and impact the reputation of the company. In part 1 of this article series, we’ve only set up one environment for the users, which has the problems we just described.
Production environment
The version of application currently accessible by the users is running in the Production environment. It is possible to have multiple versions of an application running in Production, for example if there is a stable and beta version. As both are available to the users, they are both running in what we call a Production environment.
The application needs to evolve to offer new functionalities and having the development team directly working on this environment has a high chance of impacting the quality and reliability of the application. Indeed, developers can easily introduce changes that can negatively impact the user experience. In addition, some components of the infrastructure might change. This could potentially include breaking changes.
For example, the Kubernetes version running on the cluster can be upgraded by the Cloud Provider and add incompatibilities with some Kubernetes resources, breaking the application even if it was not modified.
Staging environment
To prevent this, we decide to set up a non-production environment, called Staging, which is not available to the users and usually runs the current or next production version of the application. This environment can safely be used to intensively test and validate the application without impacting the existing Production environment. This doesn’t guarantee the application will run without issues once deployed into Production, but it greatly minimises the risk of issues the users might encounter.
That’s why it’s important that the Staging environment reflects as close as possible the Production environment. If issues are discovered in this environment, it is important that they are fixed before releasing the application into Production.
Automation testing is a great way to test for regressions in the application. It can greatly reduce the human time needed by the team to validate the application. If the entire validation process is automated, one can imagine releasing the application very often.
Otherwise, the validation process takes more time and requires the application not to change during that time. The development team is likely to publish new changes on a day-to-day basis, which can impact the validation process if the environment is shared.
If acceptance tests are performed, it is possible that one functionality might be working when tested and be broken after an update by the developers, which could then be wrongly labeled as validated.
Development environment
To prevent any conflicts, we are adding an additional environment called Development. In this environment, developers can safely push their changes on a day-to-day basis without impacting the Staging and Production environments.
Breaking changes in the Development environment are accepted as normal and get resolved during the developments of the application. During each release cycle, the content of the Development environment is frozen and properly tested in the Staging environment.
The new infrastructure

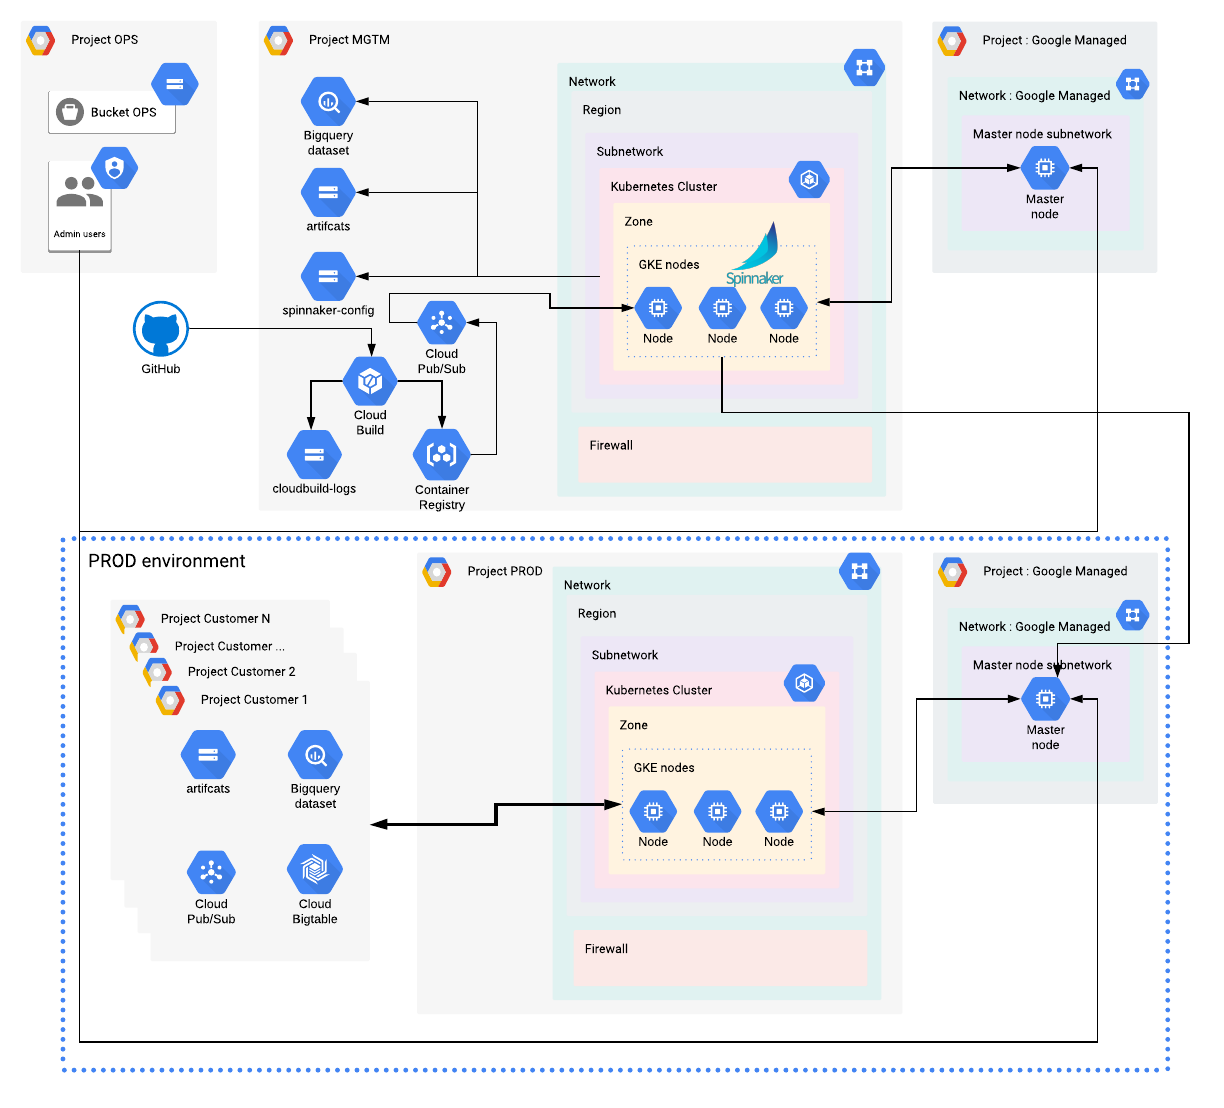
We are adding 3 environments to our current infrastructure : Development (DEV), Staging, and Production (PROD). On the diagram, we are only showing one additional environment (PROD), but all 3 environments can be represented with the same components within the blue rectangle.
Dedicated GKE clusters
Each environment has its own dedicated GKE cluster, running a specific version of the application:
- DEV runs the latest version of the application, which is updated and deployed multiple times per day
- The Staging runs the next release of the application, and its purpose is to validate the application runs as expected, plus that it’s meeting some quality criteria before going into Production. This version is only updated with bug fixes and doesn’t include changes made on the Development environment once the code is frozen
- The PROD environment runs the current release of the application, which is used by the users. This environment is only updated when a new release has been validated
Isolating Kubernetes resources
We add dedicated projects for each customer, to store their own Cloud resources and data to fully isolate them from other customers. For example, BigQuery Dataset, Pub/Sub topics, etc..
❔What is the difference between a Customer and a User ? In this article, we consider a Customer to be paying for the application. A User is only using it. For example, it is common to provide a SaaS solution to Customers, where in turn those Customers have users. It is also possible that the users are the customers.
It is often necessary to isolate the Kubernetes resources from each customer. Using a dedicated GKE cluster per customer is possible to meet this requirement, but it quickly becomes quite expensive and increasingly difficult to manage. Instead, Kubernetes has the concept of Namespace, which virtually isolates the resources in a single physical cluster.
- Each customer has its own dedicated namespace to run its Kubernetes workload
- Each namespace requires specific credentials to prevent unauthorised access
The MGMT project will only run Spinnaker workloads necessary to manage the three other environments. Only Spinnaker can deploy the application in an environment, according to the pipeline’s definitions.
That means we won’t deploy any other workloads in our MGMT cluster.
Spinnaker credentials
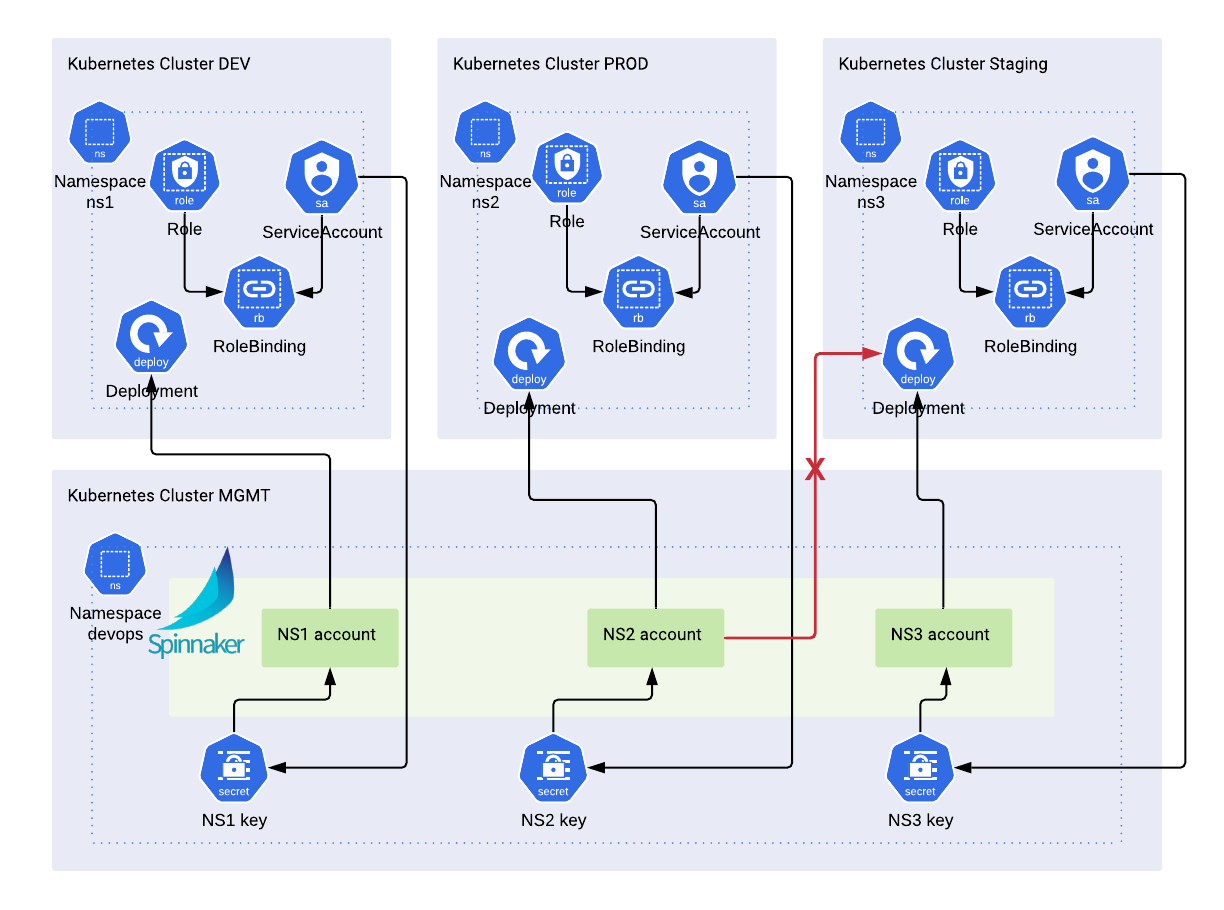
By default, Spinnaker can only deploy resources in the namespace it is installed in. In our case, it’s in the “devops” namespace in the MGMT cluster. To implement the architecture we defined, we need Spinnaker to be able to deploy workloads across multiple clusters and namespaces. To do so, we need to generate credentials for Spinnaker that have access to a specific namespace in a specific cluster.

Spinnaker uses the Kubernetes authentication methods to deploy Kubernetes resources. We are going to generate one Kubernetes service account per namespace with defined permissions (RBAC) and save the credentials in a kubeconfig file, which will be provisioned to Spinnaker by Halyard.
Each kubeconfig file is linked to one and only one set of credentials. The credentials are saved in the “devops” namespace in the MGMT cluster as a Kubernetes secret. Once provisioned, Spinnaker will have a Spinnaker account linked to the namespaced credentials. A pipeline will be able to deploy the authorised Kubernetes resources into that namespace only.
Trying to deploy any resources in another namespace, within the same cluster or not, will fail. This is great to isolate resources and prevent pipelines to manage resources from a non-authorised namespace.
Provisioning credentials to Spinnaker
Spinnaker accounts are managed by Halyard using the Kubernetes Provider. Thus in order to automate the credentials provisioning, we need to use Halyard to configure new Spinnaker accounts. Manually, we would use the Halyard command
hal config provider kubernetes account add ACCOUNT [parameters]
where the parameters include the kubeconfig credentials file, the namespace and additional parameters we want to use. This command adds a new account to Spinnaker. In order to take effect, Spinnaker must be redeployed with Halyard
hal deploy app
After a few minutes, the account is available in Spinnaker in the Deploy Manifest (v2) stage.
Because we have set up RBAC on the credentials, this account can only deploy resources in the designated namespace. Deploying resources in another namespace will fail as expected, preventing unauthorised operations.
Automating the process
Adding or updating accounts manually can be a challenge when the number of accounts grows. To simplify the management of accounts, we are going to automate the process. To do so, we’re going to use Terraform.
In each environment, we have a specific configuration for the namespaces, and thus the accounts, we want to have. In this example, we have a new environment (dev) alongside our mgmt environment.

And within our configuration (dev.tfvars) we have the following account configuration
 where we have hidden the full configuration for simplicity. We are going to use that configuration as an entrypoint for our provisioning process.
We create a new module named crosscluster in which we add the necessary resources to perform the provisioning, including service accounts, namespace, roles etc. We also write a shell script executing the Halyard commands which is run by a kubernetes job. Because halyard is running in our mgmt cluster, we can use the halyard API to run any commands we want.
❗Halyard does not have an HTTP API, so we cannot use curl to send commands. Instead, it relies on communication via WebSocket. We use wscat to execute commands from the Halyard running in our mgmt cluster.

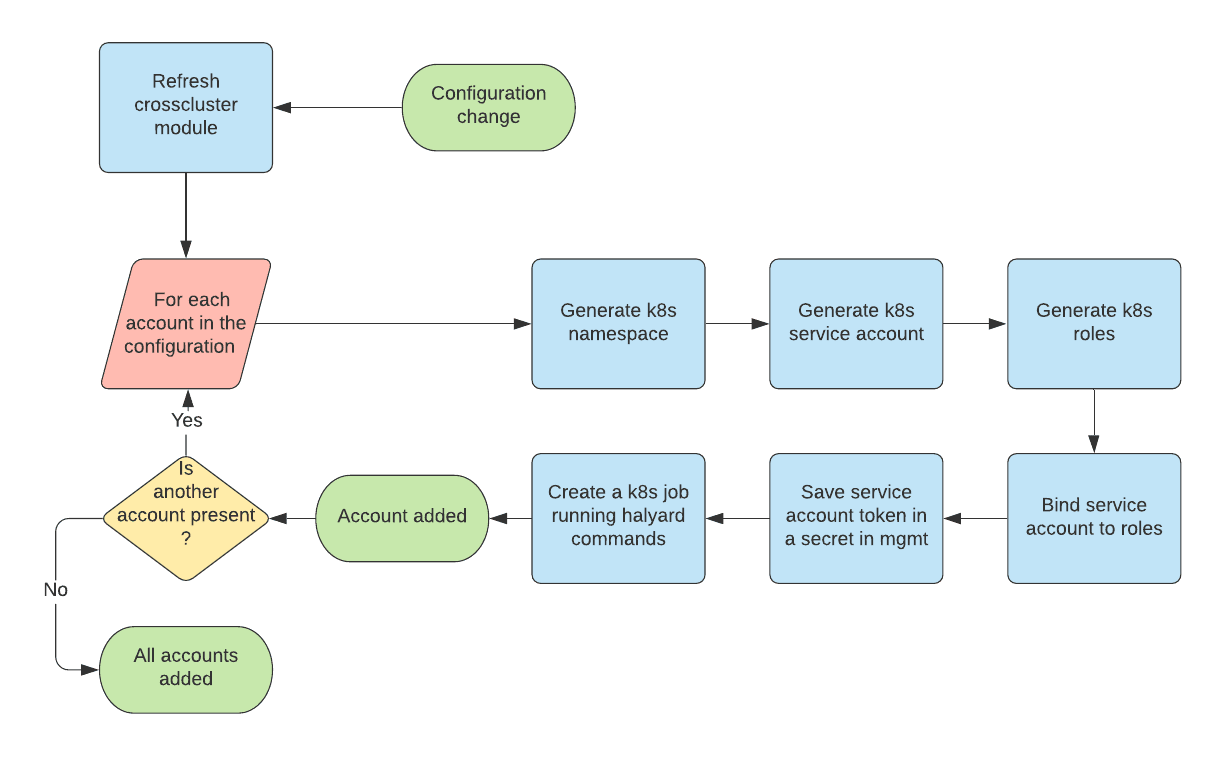
The workflow is the following:
- Add accounts in the configuration file
- Run Terraform. It will refresh the state and detect new accounts to be used with the crosscluster module
- For each account in the configuration, Terraform does the following:
- Generate a namespace according to the configuration value
- Generate the Kubernetes service account that will be used by Spinnaker
- Generate the roles and permissions, limited to the newly created namespace
- Bind the service account to the role, locking the service account to this namespace
- Save the service account token in a secret in the mgmt cluster
- Create a Kubernetes Job which runs our shell script to execute the Halyard commands
- Once done, all accounts have been added to Spinnaker

Deployment strategy
Now that we have set up our environments and have a way to provision Spinnaker with new credentials dynamically, we need to define the deployment strategy for each environment.
In part 1 of the series, we used GitHub as a code repository which contained only one branch, the “master” branch. We are going to upgrade the branching model to the GitHub flow branching model with a few adaptations, which better suits our needs. This is perfectly fine according to the definition of the GitHub flow.
❕Different teams may have different deployment strategies. For some, it may be best to deploy to a specially provisioned testing environment. For others, deploying directly to production may be the better choice based on the other elements in their workflow.
This is the deployment strategy we are going to use in this article:
- The “master” branch must be deployable in Production at all times
- All “release” and “feature” branches are created from “master”
- The “release” branches are deployed in Staging
- Once the release is validated, the “release” branch is merged into “master” and deployed into Production
- The “develop” branch is deployed in Development
- The “feature” branches are reviewed and deployed in Development
To reflect this strategy, we create Cloud Build Triggers based on the branching model:
- A code change in “develop” or a “feature” branch triggers a new deployment in the Development environment. This allows the developers to see how their changes behave within the Development environment and get instant feedback to quickly and efficiently fix rising issues
- Creating or updating a “release” branch triggers a new deployment in Staging
- A code change in the “master” branch triggers a new deployment in Production
With this strategy, the “master” branch is deployable at all times and always contains the latest validated release of your application.
Release branches are used to work on a release candidate which is in sync with the Staging environment. Finally, “feature” branches are used to develop new features and are deployed first in the Development environment. Ongoing development of new features and functionalities can be deployed without impacting the Production or Staging environment. Validation of a release candidate is not impacted by daily changes made by the development team and can be performed without impacting the Production.
> It is possible to work only with “master” and “feature” branches, like described in the GitHub flow, and create a deployment strategy based on those branches only. However, using “develop” and “release” branches is a nice addition to better control what is deployed in the Development and Staging environment without impacting the “master” branch.
Conclusion
In this article, we have seen that we can improve from a basic CI/CD solution using a single cluster to a more complex solution which better fits the needs of a production-grade environment.
We have set up a Development, Staging and Production environment with Terraform. We isolated the Kubernetes workloads per account, using Kubernetes namespaces, and protected them with dedicated credentials and proper access control. We also improved the Spinnaker pipelines to use accounts in order to only deploy workloads in authorised namespaces, preventing accidental or malicious operations.
By setting up a branching model, we were able to control what code would be deployed in which environments and when,. This allows us to easily develop, test and release new features for our applications automatically.
What’s next?
Spinnaker is now in control of the deployments for all environments and namespaces, as it should be. However, it also becomes a weakness and a potential central point of attack: even if we can’t execute pipelines which don’t have the right account, it is still possible for a Spinnaker user to modify, execute or delete Spinnaker resources. If a hacker can breach Spinnaker and access it, it will have the same capabilities than any Spinnaker user.
In the next article in this series, we are going to focus on security and we will see how we can protect Spinnaker by authenticating users and use proper RBAC to protect the Spinnaker resources such as accounts and applications. We will also see how we can further protect our Kubernetes Clusters by using Authorised Networks, Pod Security Policies and mTLS between services with Istio.
Questions? Need guidance from experts? Contact Us today!
