In this article, we are going to show you how you can harden your Google Kubernetes Engine (GKE) clusters with more security using Terraform & Istio. You’re going to learn which benefits each new security measure brings, and how you can configure them using Terraform to easily integrate them in your infrastructure. At the end of this post you can find some of our best practices to follow when developing with Kubernetes and on GKE. This article is a sequel to our previous posts in this series about how to set up secure multi-cluster CI/CD pipelines with Spinnaker on Google Cloud, using Terraform.

This article is Written by Kevin Serrano, Google Cloud engineer at Devoteam G Cloud & CTO at Nessie
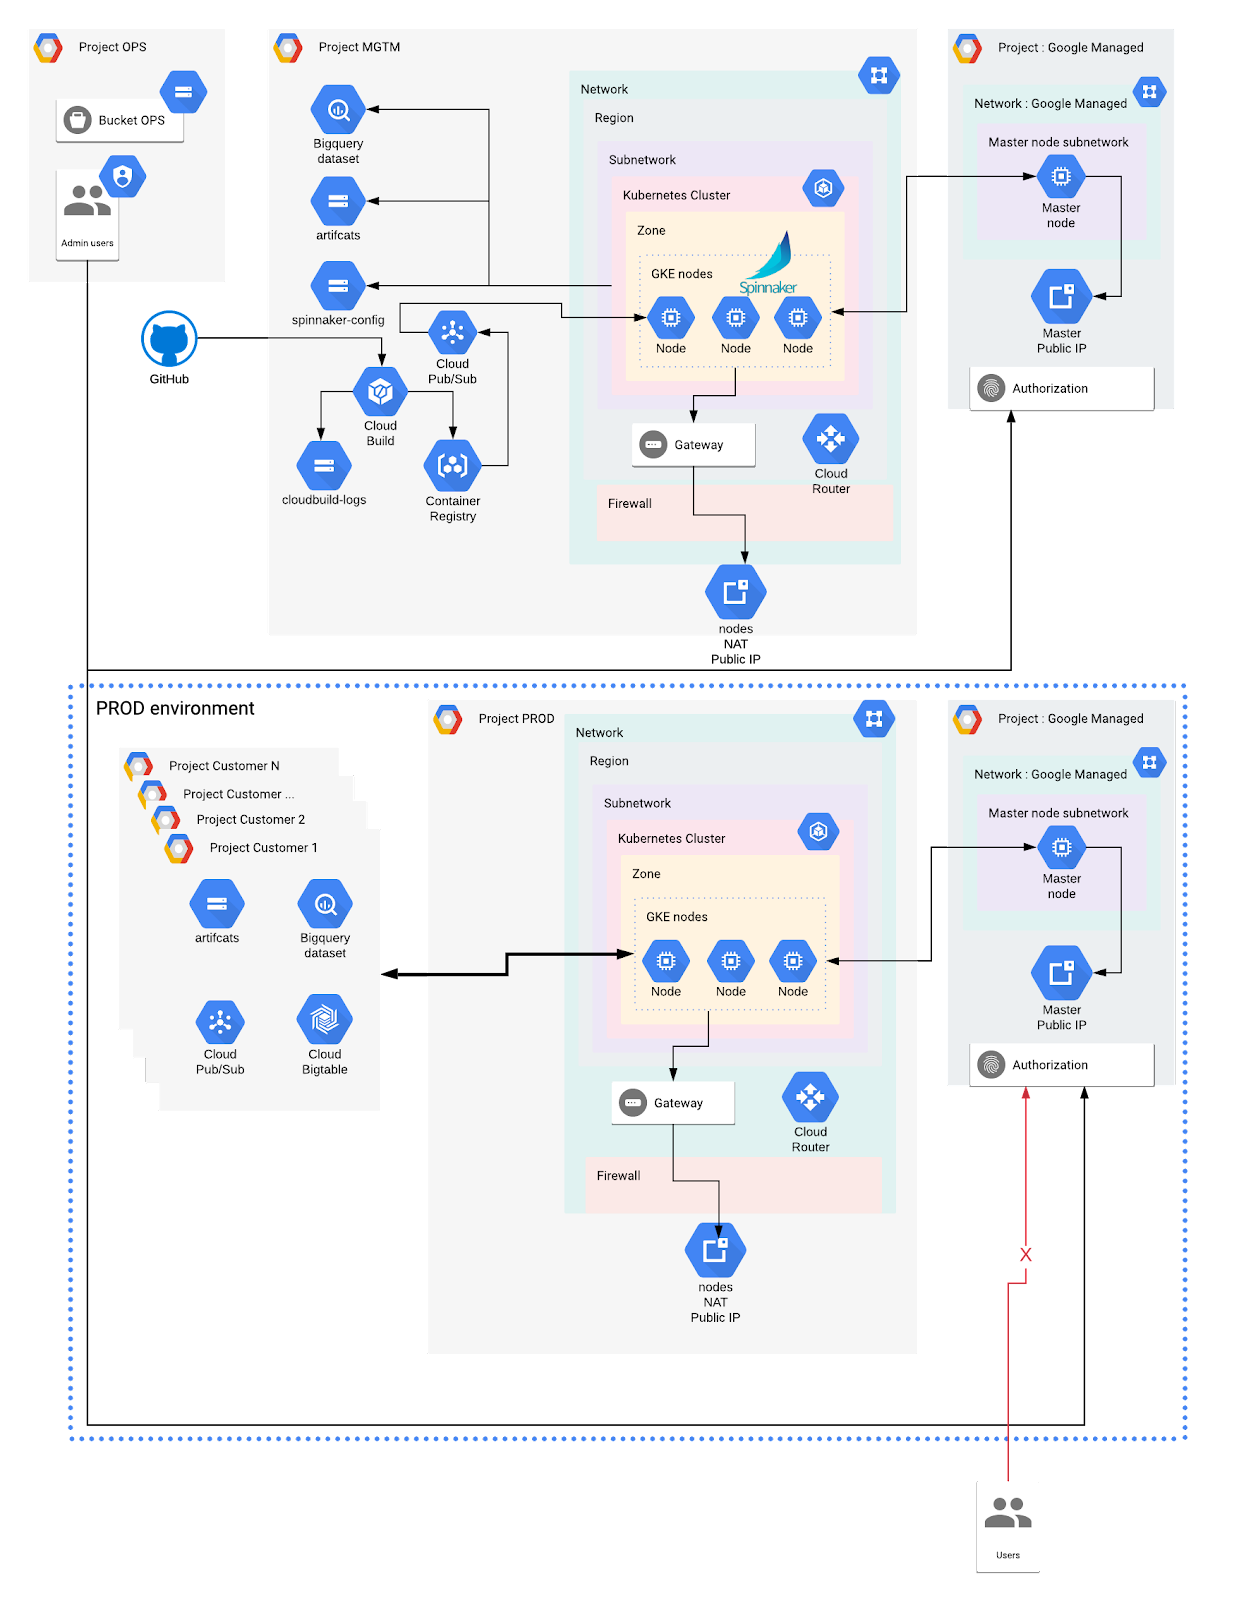
In the previous articles of this series, we used Terraform to setup multi-tenants Google Kubernetes Engine (GKE) clusters in multiple environments (Dev, Stagging, Prod). We also isolated cloud resources in dedicated Google Cloud Platform (GCP) projects and Kubernetes resources within namespaces. In addition, we securely configured credentials for each namespace and provisioned Spinnaker to manage the workloads on each cluster independently.
This is a short overview of this article series:
- Part 1: Deploying multi-tenant Kubernetes Deployments in a VPC-native cluster with Spinnaker on Google Kubernetes Engine (GKE)
- Part 2: Using Spinnaker for multi-cluster deployments in clusters
- Part 3: Improving security of your GKE cluster: Private clusters (this article)
- Part 4 Protect your Spinnaker applications and accounts with RBAC (coming soon)
Now it’s time to bring more security to our GKE clusters!
First, we are going to explore the different types of clusters GKE offers. We will explain what are the advantages of using a GKE Private cluster and we will learn how to secure its access.
Second, we will introduce Istio and explain how to use some of its features to control the traffic within the clusters. Third, we are going to explore three security features we can use on GKE to control our workload.
Finally, we will review some security best practices in Kubernetes, which can also be applied more generally to multiple architectures.
Table of Contents
- GKE Private cluster
- Network and Firewall rules
- Terraform snippets
- Istio Service Mesh
- Customisable Istio installation with Terraform on GKE
- Securing Workload
- Workload Identity
- Network Policies
- Pod Security Policies
- Best Practices
Public vs. private GKE Clusters
Public GKE Cluster
GKE offers two different cluster accesses: Public and Private Cluster. A Public cluster doesn’t imply the cluster can be publicly managed. It means the Master and nodes IP are public, and thus can be accessed from anywhere on the internet. Authentication and Authorization are still in place to restrict calls to the Kubernetes API server on the Master.
When a cluster is created on GKE, this is the default and the least secure option available. Exposing both master and nodes with public IPs increases the risk of compromising the cluster and the workloads. For example, it will be easier for an attacker to abuse an exploit that allows him to SSH into the nodes if they are exposed on the internet.
Private GKE Cluster
On the other hand, a Private cluster doesn’t assign public IP addresses to the nodes. It reduces the attack surface and the risk of compromising the workloads. The Master node, which is hosted on a Google-Managed project, communicates with the nodes via VPC peering.
This peering is automatically set up by Google and should not be modified or removed. The Master node IP can either be private only, or have both a public and private IP. Both have their pros and cons.
- Set the Master node IP to private. In this case, the Master node doesn’t have a public IP. This means the Kubernetes API cannot be accessed from the internet at all. This is the most secure option. To access it, we need to configure a connection to the network. This can be achieved by deploying a proxy inside the VPC that we will use to communicate with the Kubernetes API over Cloud VPN or Cloud Interconnect from an on-premise network. This option can be expensive and complex to set up.
- Set the Master node IP to public, with authorised network enabled. In this case, the Master node has a public and private IP, while the nodes only have privates. Access to the Master node can be restricted by enabling Master Authorized Networks, which only allows specific IPs to connect to the Master node. This option is a good compromise to get adequate security without having to use a dedicated connection to the Kubernetes API like mentioned above.
Private GKE Clusters with a public endpoint
In the setup we define for this article, we choose to use a third option. We wrote Terraform code to create the private clusters with a public endpoint for the Master node. It is then protected by Master Authorized Networks where we only allow known IPs to connect to the cluster.
This doesn’t replace authentication to the cluster. Each user is still required to authenticate in order to use the Kubernetes API running on the Master node. Access management is still done using GCP IAM roles, which are translated to pre-defined RBAC in Kubernetes. For more granularity, using Kubernetes RBAC is necessary.
Networks and firewall rules
A VPC-native Cluster is required to configure our desired network components.
Defining private IP ranges
We first need to define private IP ranges for the nodes, services and pods. To do so, we define a subnetwork in our VPC network. A subnet in Google Cloud has a primary IP range, and optional secondary ranges (IP alias ranges). We will create 2 secondary ranges within our subnet. GKE will assign nodes IP from the primary IP range, and will use the 2 secondary ranges for Pods and Services respectively.
In addition, we create firewall rules to allow internal traffic within the subnetwork. In Google Cloud, we can use service accounts as a source and destination parameter of a firewall rule.
Google Health Check
It is recommended to enable Google Private Access, so Google services are reachable without going over the public internet. However, we still need to allow Google Health-check to verify the nodes status. A firewall ingress rule must be created to allow Google Health-checks (currently, the IP ranges for this are 130.211.0.0/22 and 35.191.0.0/16)
For the nodes to be able to receive traffic from the internet, which is not possible by default due to the lack of an external IP address, we need to define a Cloud NAT in front of our nodes. The NAT provides a public IP in front of all nodes. Ingress traffic is denied, which protects the nodes, but the requests coming from some workloads running on the nodes will be allowed.
A firewall being stateful, if a firewall egress rule allows an outgoing request, the response is always allowed by the firewall as well, independently of the ingress rules in places.
We then create a Cloud Router to redirect the traffic to our network.
Terraform code
The Terraform resource google_container_cluster describes the parameters to configure a GKE cluster. To configure a GKE Private cluster with Master Authorized Network enabled, we need to configure the private_cluster_config, master_authorized_networks_config and ip_allocation_policy (optional) fields. By default, GKE will reserve private IP ranges for the nodes, pods and services from the VPC network. However, it is better to optimise the IP address allocation based on the (future) needs.
Because we want to manage the configuration of each IP ranges used by the Master Authorized Networks configuration, we use dynamic blocks to keep the code DRY. We also define local variables to combine the IP created by our Terraform setup (e.g, Spinnaker IP, Cluster IP) with the ones from our configuration.
Sample from the main configuration files, like mgmt.tfvars, dev.tfvars, etc:
|
resource “google_container_cluster” “gke_environment” { … |
This means we want this IP range, which can only contain a unique IP, to be authorised in the corresponding cluster.
Code sample for the GKE cluster definition, in the gke module:
|
locals { |
Istio Service Mesh

Istio is a very complex tool with a lot of features. It would take too long to explain all the possibilities Istio has to offer here. To learn more about what is istio and why to use it, we recommend reading their website and running the provided samples.
The Istio architecture is composed of istiod, which is part of the control plane, and sidecar container called envoy-proxy.
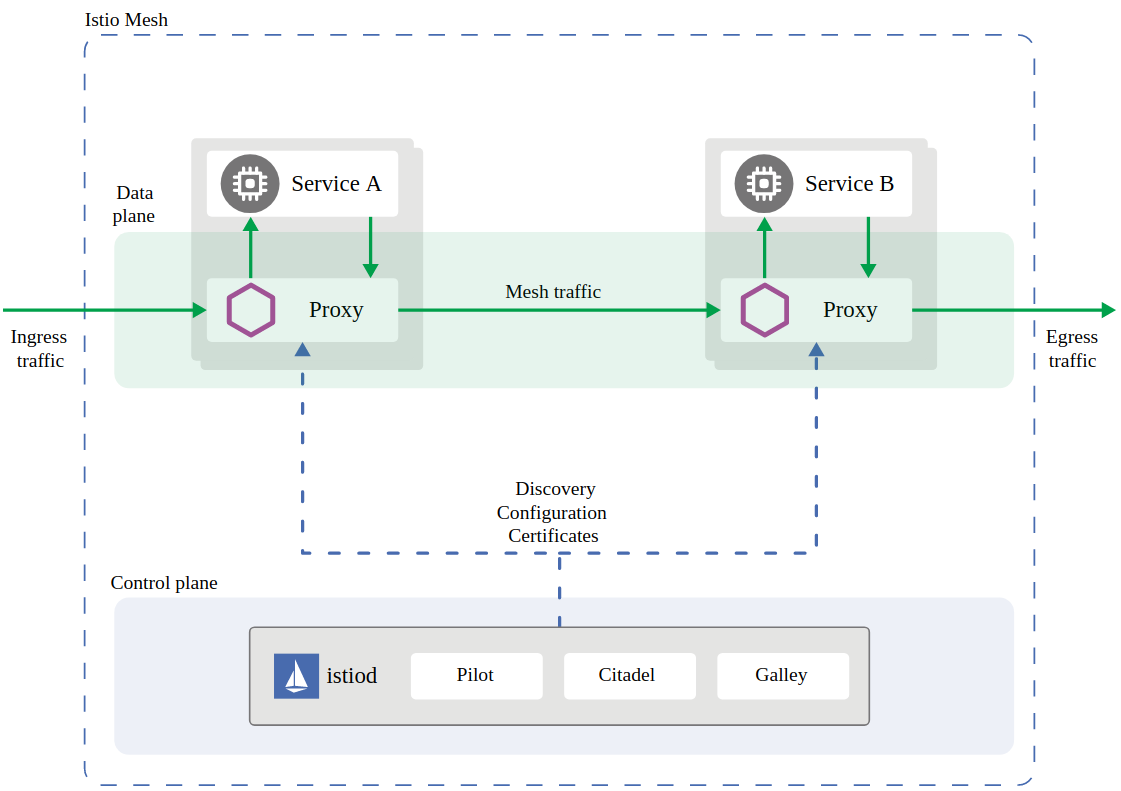
The sidecar proxy runs in a second container within the same pod as the application. It handles network traffic and enables additional security features such as Mutual Authentication (mTLS), which is enabled by default on Istio version 1.5+.
Customisable Istio installation with Terraform on GKE
There are multiple ways to install Istio on GKE. The simplest one is to use the default Istio installation managed by GKE, which can simply be turned on from the console. This method however doesn’t let us customise our installation.
Up until Istio version 1.5, it was possible to use HELM to install Istio. However, this method is deprecated and not recommended anymore.
Recommended installation of Istio
Starting from Istio version 1.6, the recommended way to install Istio is to use istioctl, which packages Istio Custom Resources Definitions and the Istio Operator to install the Istio Kubernetes Resources such as Gateway, Virtual Service, etc. This solution lets us fully customise the Istio installation, and makes it easy to update it as the needs evolve over time. It also comes with default Istio profiles, which are pre-defined Istio installation configurations, which can be used as a base for custom ones.
In general, it is possible to define custom resources, using Custom Resource Definition and Operators in Kubernetes
Because istioctl is a CLI, we can use the official docker image to install Istio based on a configuration we define. We can integrate the installation in our Terraform setup, and add additional resources to automatically make istio available.
Customisable Istio installation on our clusters
Our goal is to have a customisable Istio installation on our clusters, where we can securely access Kiali and Grafana, which is connected to Prometheus. We also require all the traffic to go through the Istio ingress gateway, and not directly to the applications within the service mesh.
What we need to do:
- Define the credentials used by our installation process
- Define the Istio configuration
- Install Istio based on the configuration
- Expose Kiali and Grafana with a Global HTTPS Load balancer
We first add an istio module in our Terraform setup. We can then define a Google service account with the roles/containers.Admin role, as this permission is necessary to install all the Istio resources in the cluster. We then map this GCP service account to a Kubernetes service account using Workload Identity (see third section to know more about Workload Identity).
Then we define a custom profile (istio-config.yaml) based on a pre-defined profile. We can list the predefined profiles by running
|
istioctl profile list |
and then dumping its content (here default profile)
|
istioctl profile dump default |
This is the easiest way to customise a profile. For example, this configuration file will enable the `istio-ingressgateway` and add the components Grafana, Prometheus, Kiali and Tracing (Jaeger)
|
$ cat istio-config.yaml apiVersion: install.istio.io/v1alpha1 |

