Your VMs to Google Compute Engine in 9 steps.
Are you still managing on-premises VMs? Then you will no doubt recognise the following points: the server equipment needs maintenance, a sufficient number of IT staff is required, energy prices are skyrocketing, you need sufficient capacity for peak loads and so on! Because of all these issues, a lot of companies are switching from local data centres to a cloud environment, either completely, or in a hybrid configuration.
GCP has a tool available to facilitate the migration of VMs to Compute Engine, called Migrate to Virtual Machines (formerly Migrate for Compute Engine). This tool allows for relatively simple VM migrations, with minimal downtime. VMs can be migrated on their own, or as part of a migration group.
In this lift-and-shift migration, existing workloads are moved to the cloud with minimal changes, allowing everyone to keep using them as they did before. Much easier and faster than the improve-and-move or remove-and-replace migrations. Ideal if you want to migrate your workloads in a short time frame before refactoring them to a more cloud-native solution, or if you can’t refactor them due to technical reasons. This post will offer a quick step-by-step guide and some tips on how to migrate a group of VMs using Migrate to Virtual Machines.
Setting up the project
Step 1: setting up the host project
To use Migrate to Virtual Machines, you need a host project. The host project will initiate all migrations and will register to the connector (see later). If you want it to, the project can also run the migrated workloads. Further in the guide, you get more information on setting target projects.
The host project will need to have the following APIs enabled:
- Migrate to Virtual Machines API
- Service Management API (enabled by default on a new project)
- Service Control API
- Identity and Access Management (IAM) API
- Cloud Resource Manager API
- Compute Engine API
Groups with users that should be able to perform migrations need the VM Migration Administrator role. Groups with users that need to view information about migrations should get the VM Migration Viewer role.
Step 2: setting up the source
In order to reach your VMs, you need to set up a source. You do this by installing a connector on the source and registering it with your host project. Traffic from your source to the Google Cloud APIs will go over a secure path through the public internet. For a VPN or Interconnect, you can use Private Google Access instead. See this architecture document for more details.
In this post we will not expand on the process, but you can follow the steps in this quick start guide (small comment: the command used to register the connector in this guide is m4c (migrate for compute), whereas it now is m2vm).
Step 3: target project
The target project will run the workloads. As mentioned before, this can be the same as the host project.
The following APIs need to be enabled:
- Service Management API
- Service Control API
- Identity and Access Management (IAM) API
- Cloud Resource Manager API
- Compute Engine API
The user adding the target project will need the Project IAM Admin role, in addition to having the VM Migration Administrator role on the host project. If you have these roles, you add the target project in the console, under the targets tab in Migrate to Virtual Machines.
If you are unable to assign the IAM Admin role to the user setting up the target project, you need to manually assign the Migrate to Virtual Machines default service account to the VM Migration service agent role on the target project.
Migrating VMs
Migrations can be done one by one, or you can group VMs in a migration group to track them and migrate them together. You can also use groups to migrate individual VMs.Therefore, I’d recommend always using the migration groups, so you have a better overview of ongoing migrations.
Step 4: set up a migration group
Navigate to the Google Cloud console > Compute Engine > Migrate to Virtual Machines. Go to Sources, and select all the to-migrate VMs.
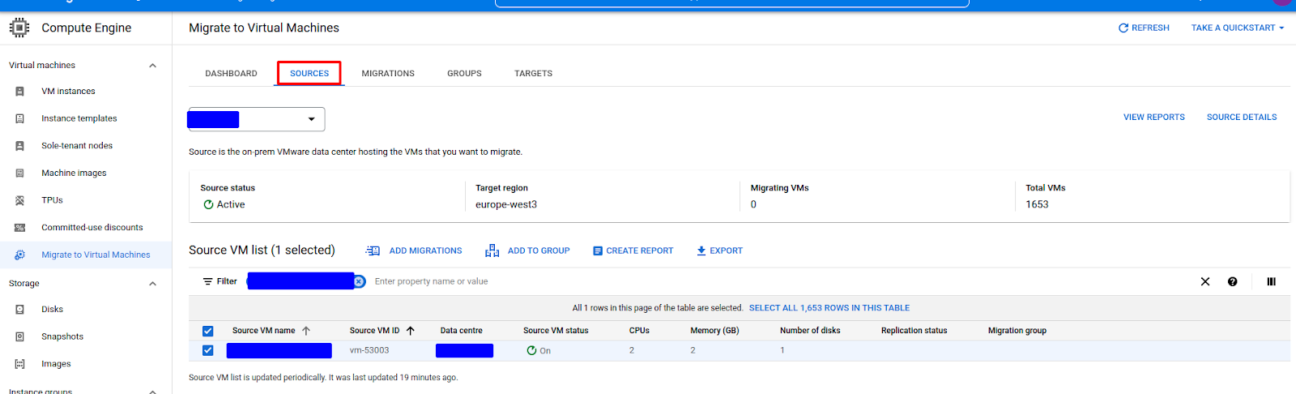
Once all desired VMs are selected, click ‘Add to group’, and create a new migration group.
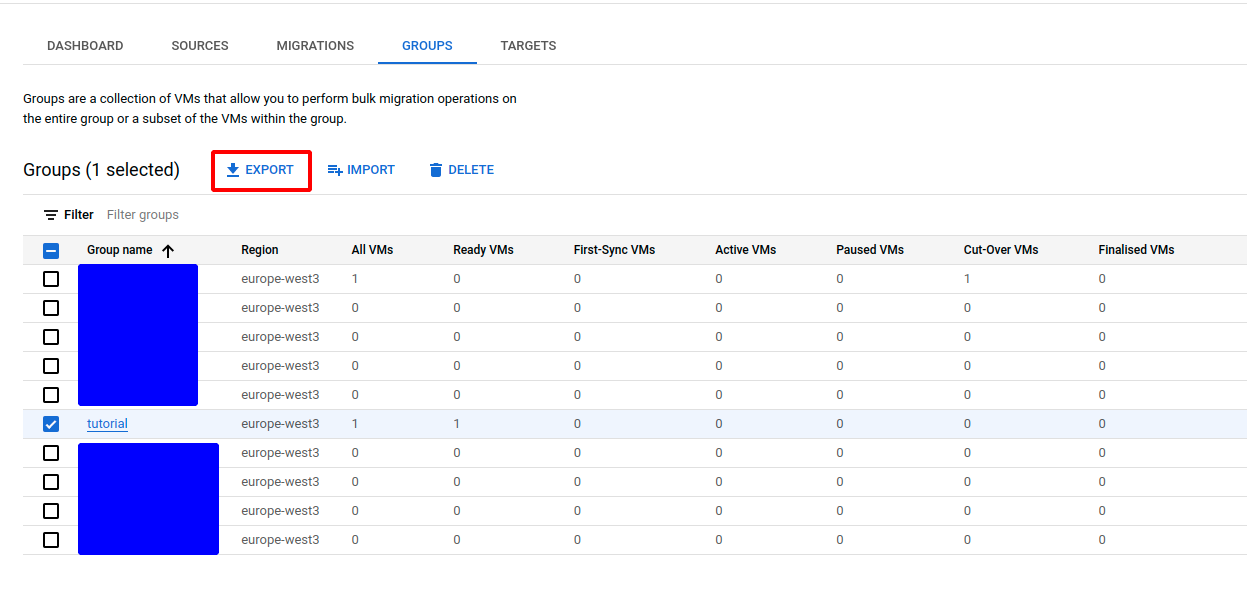
Afterwards, navigate to the ‘Groups tab’, and select the newly created group.
You can change the target migration settings for each VM individually. When doing group migrations it’s often more interesting to configure all VMs at once. You can export the migration group to a CSV file, and edit the settings there. With your desired group selected, press export to generate the CSV file.
Save this export, and open it in your editor of choice (or import it in google sheets). Fill in the required specifications. Some values are required, while others are optional. Region, source name, source VM name, source VM ID and migration group should already be filled. The following are required:
- Instance name, for example: tutorial-vm
- Project, for example: projects/pj-m2vm-tutorial-host/locations/global/targetProjects/pj-m2vm-tutorial-target
- Zone, for example: europe-west3-c
- Machine type series and machine type: make sure these are sized appropriately. For example: n2, n2-custom-2-2048
- Network and subnetwork, the name of the VPC and subnet in which to place the VM. For example: nw-m2vm, projects/pj-m2vm-tutorial-target/regions/europe-west3/subnetworks/nwr-m2vm-tutorial
There are several other options of interest that should probably be filled in:
- Disk type, for example: Standard
- External IP, it’s recommended to limit using external IPs on VMs as much as possible. If needed, this can be set to ‘ephemeral’ or to the name of a prior reserved external IP.
- Internal IP, if you need a specific internal IP. Otherwise it will be generated automatically from your subnet range.
- Network tags, for example: nwt-https-server
- Service account. As it is best practice not to use the default compute service account, you should specify a service account with restricted IAM permissions for your VMs.
The other values can be filled as needed.
After editing the CSV, you can import the file to update the migration details of the migration group.
Step 5: start the replication
Click on the migration group, you should see a list of all the VMs in the group. Select the ones that you want to start the replication for, and click Start Replication.
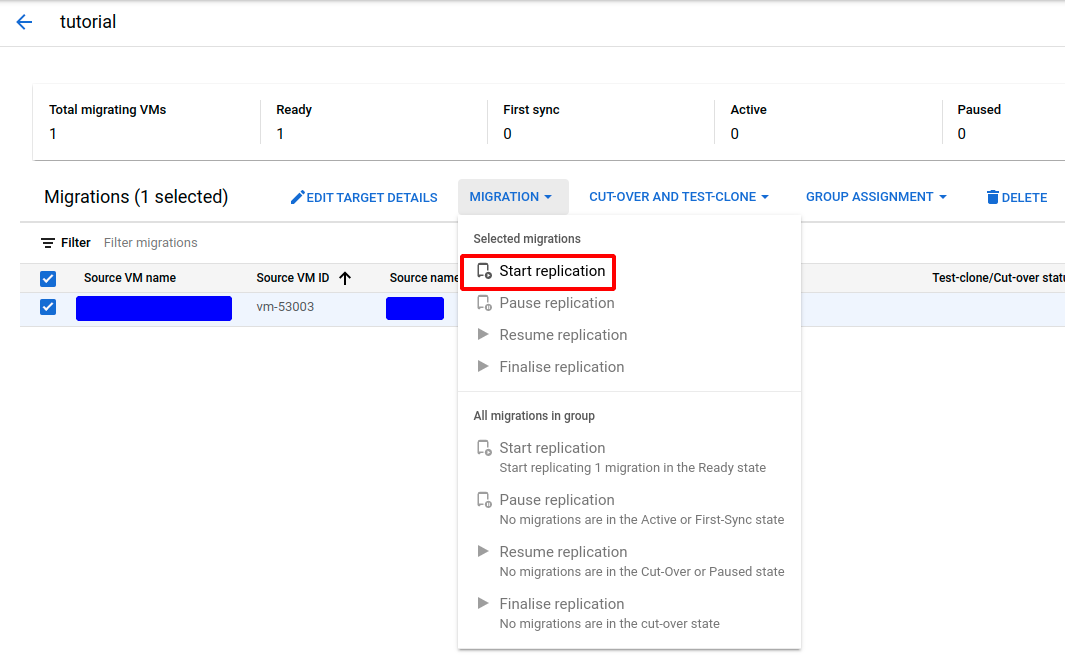
Depending on the size of the VMs and the capacity of the connection, the first replication can take a while. Once it is finished, the VMs are ready for cut-over, but we recommend doing a test clone first.
Step 6: test-clone
Test-cloning in Compute Engine will create the latest replication of the VMs as images, but it will not touch the source VMs. The test clones validate if everything is working correctly in the cloud.
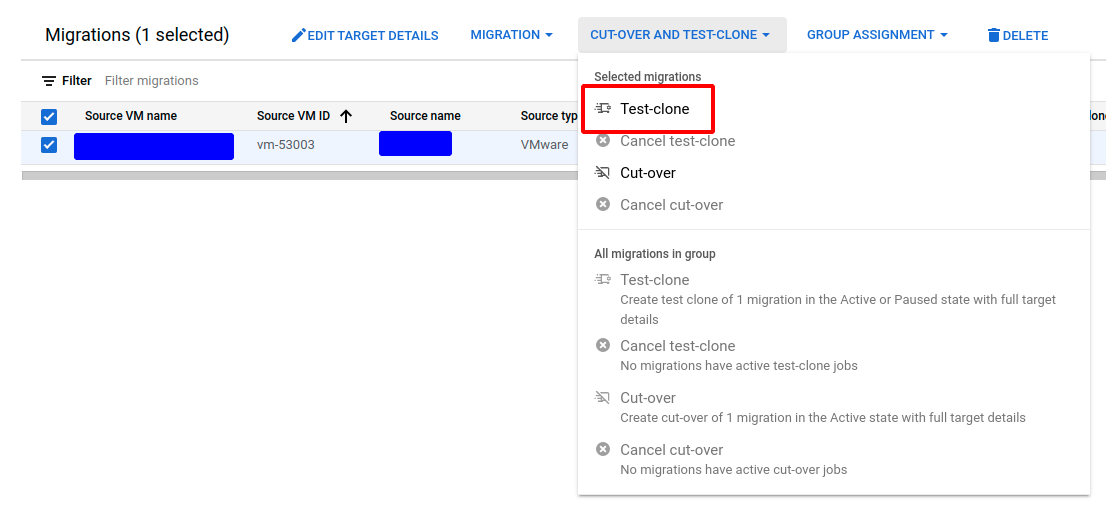
The test-clone/cut-over status columns keep you updated on when the test-clone is finished. The test clones will be available as normal Compute Engine VMs, and can be inspected as you would normally do. The image will continue to be replicated, even when test clones are running. However, the test clones will not be updated as replication continues, they will keep the image as it was when the test clone was initiated. To test newer images, start a new test clone. Once you’re done testing on the clones, you can safely delete them.
If everything was successful to this point, it is time to cut-over the VMs.
Step 7: cut-over
Once everything is tested and validated, it is time to perform the cut-over. Be aware that during the cut-over, the source VMs will shut down and the VMs in the cloud will start up. There will be a small window of downtime. Make sure to take the necessary precautions for critical applications.
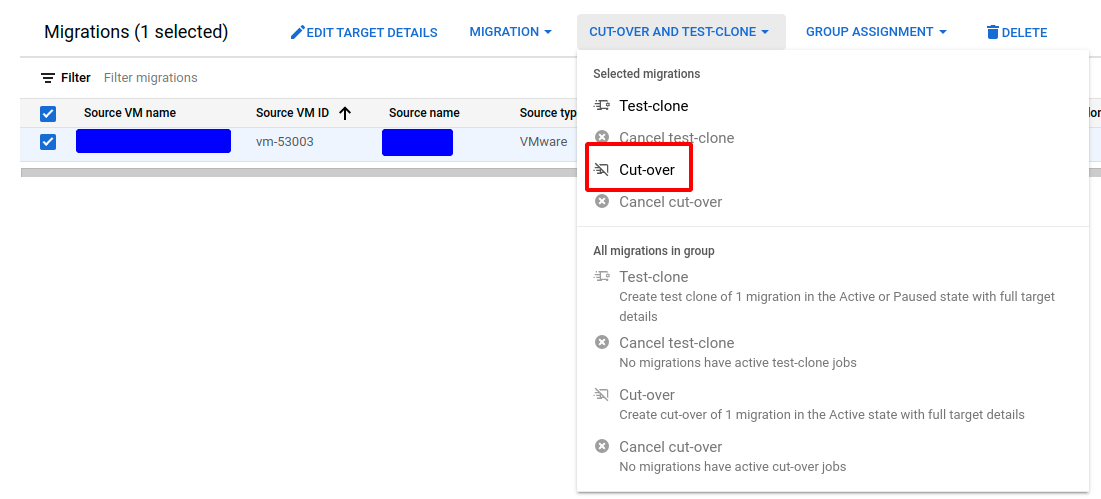
The cut-over will wait for the current replication to complete (if one is going on), shut down the source VMs, perform one final replication, and create the Compute Engine instance with the latest replication image. No more replications will be performed after this point (unless you resume them manually!).
Once the new VMs are up and running, validate again. If you are certain everything works as intended and all validations have passed, you can finalise the migration. If not, you’ll have to manually roll back the VMs by deleting the instance in GCE and starting the VMs back in the source environment.
Step 8: finalising the migration
Finalising a migration means that all replication data and other storage-related resources will be deleted. If you don’t do this step, you will continue to get billed for the replication storage. It’s an important step to perform that is easily forgotten after migrations. It can be found under the MIGRATION drop-down.
Step 9: defining everything in Terraform (optional)
At this point the migration itself is done. If you are working with Infrastructure as Code like Terraform (which we recommend!), you should define the VMs and their disks in Terraform. Start by defining the resources in Terraform (preferably using modules). After this step, import them into your state. You will need the following pieces of information to import an instance:
- The project ID
- The zone the instance is in
- The name of the instance
To import a disk you will need the following pieces of information:
- The project ID
- The zone the disk is in
- The name of the disk (this can be found in the console, see screenshot below)
Of course you need to know the addresses in your Terraform definition. If you’re unsure of what addresses your instances and disks will have, you can always run the Terraform plan to see under what address name Terraform wants to create the resources.
The command to import an instance will look something like this:
terraform import google_compute_instance.imported_vm projects/pj-m2vm-tutorial-target/zones/europe-west3-c/instances/tutorial-vmFor a boot disk it will look something like this:
terraform import google_compute_disk.imported_disk projects/pj-m2vm-tutorial-target/zones/europe-west3-c/disks/tutorial-vm-d0-0e2b9fOnce the resources have been imported, run the plan. If the plan tries to recreate your instances and/or disks, you may need to tweak your Terraform definition until there are no more changes to the instances and disks.
Conclusion
Congratulations, you now know how to successfully migrate VMs from on-premises to Google Cloud using Migrate to Virtual Machines. The Migration Center, which is in preview, will leverage this tool, among others. Migrating from AWS is currently in preview as well. Migrate to Virtual Machines makes the process of migrating VMs way more manageable and allows for migrating hundreds of VMs at once.
Should you have any questions or want to discuss upcoming migrations, feel free to contact us!
Documentation
- Migrate to Virtual Machines documentation: https://cloud.google.com/migrate/virtual-machines/docs/5.0
- Importing Google Cloud resources in Terraform: https://cloud.google.com/docs/terraform/resource-management/import
Do you want to discuss your own infrastructure project with us?

Get in touch with
Mark De Winne
Google Cloud Business Developer at Devoteam G Cloud

